


Native form validation is easy
Time to read
, 1489 words, 4th grade
It is easy to create web forms that validate themselves without JavaScript. Why so many developers ignore this native capability is an open question.
I guess that when all you have is React or similar, then everything looks like a React component.
But what happens when the user disables JavaScript (or it is otherwise unavailable)? OK, you are rendering your React components on the server. Nice. But what happens to your client-side validation?
But before we get into this, a brief digression. Letʼs take another look at our previous article, Progressive enhancement.
The requestAnimationFrame option
After I published that article, I got a suggestion from a good friend.
He recommended that I animate the accordion elements with requestAnimationFrame. So I tried it:
requestAnimationFrame as well.function toggleAccordion(event) {
event.preventDefault()
const summary = event.target
const accordion = summary.closest("details")
const content = accordion.querySelector(".xx-accordion-content")
const openHeight = summary.xxOpenHeight
if (accordion.open) {
function shutAccordion(height, stopHeight = 0, decrement = 20) {
return function () {
content.style.maxHeight = `${height}px`
if (height <= stopHeight) {
accordion.open = false
return
}
requestAnimationFrame(shutAccordion(height - decrement, stopHeight, decrement))
}
}
shutAccordion(openHeight)()
return
}
function openAccordion(height, stopHeight, increment = 10) {
return function () {
content.style.maxHeight = `${height}px`
if (height >= stopHeight) {
return
}
requestAnimationFrame(openAccordion(height + increment, stopHeight, increment))
}
}
accordion.open = true
openAccordion(0, openHeight)()
}
This example shows the toggleAccordion function. Weʼll trigger this with the click event on the summary element. It receives a MouseEvent event object.
First thing we do is call event.preventDefault. This
stops the details element from triggering its toggle event. This event will immediately open or close the details element. We want to control that ourselves.
On the next four lines we set four variables with const.
We assign the event.target, which will be the summary element, to “summary.” Then weʼll use summary.closest("details") to get the details parent element and assign it to “accordion.”
Next, we set “content” to the content div
using accordion.querySelector(".xx-accordion-content").
Finally, we call summary.xxOpenHeight to get the open clientHeight. We set that as a property in our enhanceAccordion
function (not shown) earlier.
Now we need to branch our code to handle both open and close events.
We do this with if (accordion.open). If the accordion is
already open, then we create a function called shutAccorditon. We pass this function to requestAnimationFrame
on each recursion.
We wrap this function in an outer function so that we can create a
closure around three parameters. The outer shutAccorditon
function takes these parameters:
-
The
heightto which we will set the content block usingmaxHeight. We will decrement this height by a constant number of pixels on each animation frame. -
A
stopHeightparameter which determines when the accordion finishes closing. This stops our animation. ForshutAccorditon, we will default it to zero pixels. -
The
decrement: the number of pixels by which to decrement the height in each animation frame. Here we use a default of twenty pixels.
Now we create our inner anonymous function. We return this so that
requestAnimationFrame can call it. In it, we set
content.style.maxHeight to our starting height. This is the value that we will decrement on each animation frame.
Next is our stop expression, which we use to stop the
recursion. Donʼt forget this or youʼll get an infinite
animation. We stop recursing and call return when our height
variable is less than or equal to our stopHeight
variable. Typically, this value is zero.
Finally, we call requestAnimationFrame and pass it our inner
function. We do this by calling our outer shutAccordion function.
We set the height to height - decrement. The stopHeight and decrement we pass unchanged. This forms a new closure.
Now we have our recursive anonymous function. We need to call it to
start the animation. We call the outer shutAccordion
function and pass it the openHeight. This is the current
height of the open accordion content. Then we call immediately the
inner closure that it returns: shutAccordionl(openHeight)().
Then we return from our toggleAccordion function before the
open-accordion code runs.
If the accordion is not open, then we skip that whole block. Instead
we create an openAccordion outer function. It takes the same
three parameters, except we donʼt default the stopHeight parameter. Also, we call the third parameter increment
rather than decrement. It defaults to ten milliseconds.
This means our open animation will be half as fast as our close animation.
Again, we return an inner function for requestAnimationFrame to call recursively. Again, we set the content.style.maxHeight to the value of height. But in this instance it is the
height of the closed content element, i.e., zero.
And again we need a stop expression. We are incrementing
height
on each animation frame. So we check whether it is greater than or equal
to our stopHeight. If it is, then we return immediately,
stopping the recursion.
Then, as before, we call requestAnimationFrame and pass it
our inner closure. We get this by calling our outer openAccordion
function with the same stopHeight and increment. But this time we increment our height: height + increment.
Now that we have our openAccordion function ready, we can
call it to start the animation. But first we set accordion.open to true to make sure the accordion is open. If it isnʼt, then we wonʼt see our content. It will hide our animation.
That will be bad.
That set, we call openAccordion(0, openHeight)(). We set
the initial height to zero and our maxHeight
to our openHeight.
Easy peasy.
I wonʼt go into a lot of detail here as it is pretty
self-explanatory. We create open and close outer functions
that return an inner closure. requestAnimationFrame calls that closure recursively. In this
way, we can increment or decrement the height on each frame
immutably.
Is this a potential performance bottleneck, creating all those closures? Maybe. But itʼs the simplest way to do it, and we donʼt prematurely optimize here at Craft Code. If it turns out to be a bottleneck, weʼll switch to a loop and a mutable variable.
Betcha it works just fine.
But which is better? setTimeout? Or requestAnimationFrame?
Itʼs a pretty close call. setTimeout is older and will
work in browsers such as Internet Explorer pre-v10. Of course we can polyfill
that.
An argument for requestAnimationFrame is that it may be smoother.
Especially if there are many simultaneous animations on the page. It also
may be more performant. Donʼt need to support very old browsers?
Then requestAnimationFrame
is probably the better way to go.
You should ask, “Where in the world are my users? What browsers are they using?” That will help you to determine which option is best. But then we should always start with that question, right?
Try it on our example animation frame accordion.
About those forms
Letʼs get to our forms. A few simple recommendations to start.
-
Donʼt use placeholders. Just donʼt. Use
<label>instead. Set theforattribute to theidof the input labelled. -
Group related controls in
<fieldset>elements. Use the<legend>element to label the group. Fieldsets are easily styled with CSS these days. - Ensure that your form elements are keyboard navigable. And in the same order that they appear visually. Donʼt confuse your users.
- You can best determine other considerations, such as where to put buttons or which buttons to use, with user testing. There is no one right way.
With those caveats in mind, let us begin with a simple form. Here is one with which we are all familiar … but not for much longer, we hope.
<form
  action=""
  class="xx-form"
  method="GET"
  name="simple-form"
>
  <fieldset class="xx-fieldset">
    <legend>Please sign in</legend>
    <div class="xx-form-field">
      <label
        class="xx-field-label"
        for="email"
        id="xx-email-label"
        >Email address</label
      >
      <br />
      <div
        class="xx-field-help"
        id="xx-email-help"
      >
        The email address with which you signed up.
      </div>
      <input
        aria-labelledby="xx-email-help xx-email-label"
        class="xx-field-input xx-email-field"
        id="email"
        name="email"
        required
        size="36"
        type="email"
      />
    </div>
    <div class="xx-form-field">
      <label
        class="xx-field-label"
        for="password"
        id="xx-password-label"
        >Password</label
      >
      <br />
      <div
        class="xx-field-help"
        id="xx-password-help"
      >
        Four or more space-separated words of 4+ characters.
      </div>
      <input
        aria-labelledby="xx-password-help xx-password-label"
        class="xx-field-input xx-password-field"
        id="password"
        name="password"
        pattern="[a-zA-Z]{4,}( [a-zA-Z]{4,}){3,}"
        required
        size="36"
        type="password"
      />
    </div>
  </fieldset>
  <button
    class="xx-submit-button"
    type="submit"
  >
    Sign in
  </button>
</form>
This example shows a basic HTML form. The outermost element is the
form element. We set the action, class, method, and name attributes.
Inside the form element are two child elements: a fieldset
and a button of type submit. The fieldset
contains a legend element with the content “Please
sign in”. Also, two div
elements containing the email and password fields.
The submit button has content, “Sign in.”
The two fields are similar. Each contains a label
element with a class attribute, a for
attribute set to the ID of the input, and an id
attribute. Following these, a br element, then a div element for the help text with class and id
attibutes.
Finally, each field contains the input element itself. This
is of type email for the email address field and
password for the password field.
Each has an aria-labelledby
attribute containing two IDs: the ID of the label and the ID of the help
text div. This associates the input with both label and
help. Good for users of screen readers (or VoiceOver on Mac).
Each input has an id attribute. The field labelʼs
for attribute references this ID. Each also has a name attribute,
“email” and “password”
respectively. And both inputs have the required
attribute set.
Beyond that, the email input has a size attribute set to 36
characters, as does the password input. The password input has an additional
attribute, pattern. The pattern matches four or more
space-separated words each with four or more letters.
As in previous examples, we use CSS class names on all our elements. The
xx- is a namespace, i.e., cc-
for Craft Code. This allows us to select our elements in our CSS and avoids
collisions.
We like grouping controls in fieldsets, and using the legend for the title of our form. We group our labels and inputs in <div> elements with the class name, xx-form-field. This permits
us to style them as a group.
Our view is that best practice is to put the label above the input. To make this work even when the user disables CSS, we use a <br> element. Note that we tie our labels to their inputs
with the for attribute.
Whenever possible, we choose our HTML elements to take advantage of
browser features. We chose an <input> of type
email rather than type text. Because of this,
the browser will validate the value of the input on submit.
If the value is not a potentially valid email address, then submission fails.
We also set the required attribute on the input. The form will
require a valid email address before we can submit it.
One down.
Then for the password field, we choose the password
type, which masks the characters as we type them. We also
set the required
attribute so the user must provide a password. We could use minlength to set a minimum length for the password, but we have a better idea.
As this brilliant xkcd comic makes clear, a better approach to passwords is to use four random words.
To this end, we have used the pattern
attribute on the password input. It requires the password to be four or more
space-separated words of four or more characters each.
The pattern: [a-zA-Z]{4,}( [a-zA-Z]{4,}){3,}.
Of course, we make this requirement clear with a help message above the
input. There a screen reader will announce it before
entering the field. And to be extra certain, we associate it with the input
via the aria-labelledby and id
attributes as shown.
Hereʼs what that looks like:
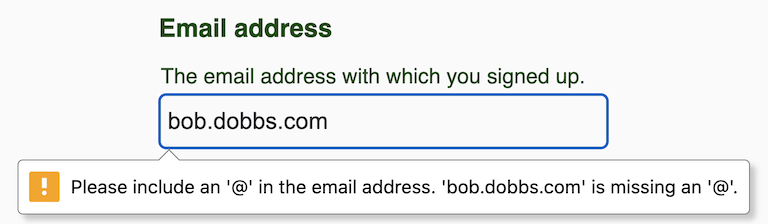
Here are the possibilities:
- Empty input (required): “Please fill out this field.”
- bob@: “Please enter a part following '@'. 'bob@' is incomplete.”
- @dobbs: “Please enter a part followed by '@'. '@dobbs' is incomplete.”
- bob.dobbs: “Please include an '@' in the email address. 'bob.dobbs' is missing an '@'.” (As above.)
Here is what happens if the password doesnʼt match our pattern:
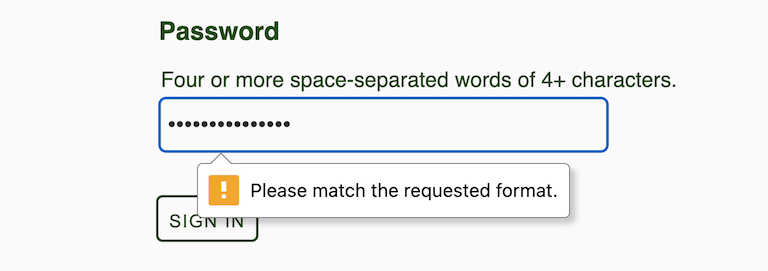
Here are the possibilities:
- Empty input (required): “Please fill out this field.”
- Bob is yer uncle: “Please match the requested format.”
Be sure that you explain what the “requested format” is! Donʼt make your users guess!
Try “correct horse battery staple”. Does it work? xkcd would be proud.
Give this simple form a try.
What else can we validate?
Different types of input provide different validations. Here are some examples:
- Pattern mismatch:
You can use the
patternattribute with other input types as well. These include:email,search,tel,text, andurl. - Range overflow/underflow:
You can set
maxandminvalues on typesdate,datetime-local,month,number,range,time, andweek. - Step mismatch:
You can set the
stepvalue (a number) on typesdate,datetime-local,month,number,range,time, andweek. Sheesh! Who knew there were so many input types? MDN provides a handy list of default values. - Too long/short:
You can set a
maxlengthand/orminlength(as a number of characters) on typesemail,password,search,tel,text, andurl.
Donʼt try to memorize these. Remember: code (and learn) just in time. There is no point in wasting time and effort that you may never need.
Instead, first design your form. Then determine what needs validation. Finally, refer to Mozilla Developer Network or equivalent to see what fits your needs.
For example, you might create an integer input like this:
<input
  id="iq"
  max="210"
  min="0"
  name="iq"
  required
  step="1"
  type="number"
/>
This example shows an HTML input of type number. The required attribute is set so that the user canʼt leave it blank. The id and name
attributes are both set.
Then, to shape the data permitted, the max, min, and step attributes are set. max is set to
210, the highest IQ on record. min is set to zero, permitting
only positive integers (or zero). We hope no one has an actual IQ of zero.
Finally, the step is set to 1. This forces the input to be
an integer rather than a decimal number. You can enter a decimal, but it
will fail validation until you remove the decimal part.
Hence, this allows IQ to be set to an integer between 0 and 210. No JavaScript required, and the browser will enforce this data shap for us.
This accepts only positive integers between 0 and 210 (the
highest IQ on record). The step value of 1
does not prevent entering decimals, such as 100.1. But try
submitting that. Youʼll get a warning:
“Please enter a valid value. The two nearest valid values are 100 and 101.”
You can try it on our example form. What happens if you enter -50? What about 300?
You could also do this with an input of type text by setting
the pattern
attribute to [0-9]*. Or use ([0-9]|[1-9][0-9]*)?
if you want to disallow starting zeros. But either way you lose the semantic
value of the number type.
Our recommendation: stick with the number input.
The key takeaway here is this: good enough is, by definition, good enough.
Too often, designers and devs create bloated, ugly, brittle, incomprehensible code. We do it because we want to tweak our interface in some minor way, but plain HTML doesnʼt make it easy. So we hack the heck out of it.
The temptation to throw out all the benefits of semantic, accessible, browser-native code just to make it a bit slicker can be overwhelming. But resist, resist, resist!
This isnʼt about UX. Your users donʼt care about your flashy interface, no matter what they tell you when you ask. Thatʼs your ego talking.
Users care about usability, findability, comprehensibility, accessibility.
Can they find what they are looking for? Can they understand it when they find it? Can they make your site do what they want it to do?
And we can manage all that with an elegant design without having to hack the code. Simple and beautiful. And more stable, less likely to be buggy, and be easier to code and refactor, too.
And if they never see your flashy, edgy new design, they will never miss it.